The Darktable quick access panel is a great idea, and you can perform almost all of your editing just using this panel. However, there is room for tweaking and making it much more efficient with just a few simple changes.
As you know, working from the bottom of the quick access panel, everything is ordered to make sense. However, there are a few things missing which can be added to make your job much easier. These could be missing panels or missing settings in the modules already present. Lets take a look…
Here is all you need to do to make the quick access panel instantly much more useful! It includes:
- Adding the Sigmoid module with setting.
Making the workflow more complete on the quick access panel. - Auto-tune in the Filmic module.
This saves on so many clicks! - Details in the Local Contrast module.
Again, a time saving option.
Initial Setup
Click on the presets icon on the work flow select section as seen below.
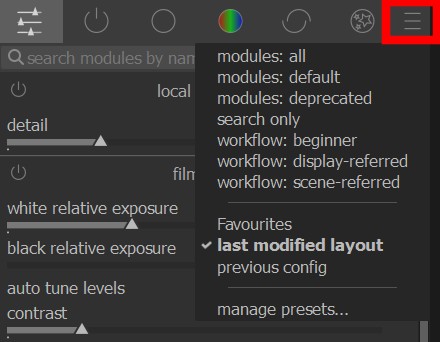
Click on the manage presets option.

Choosing your module
To the left you see the Quick Access Panel. Click on the little plus sign as shown below and choose “all modules”
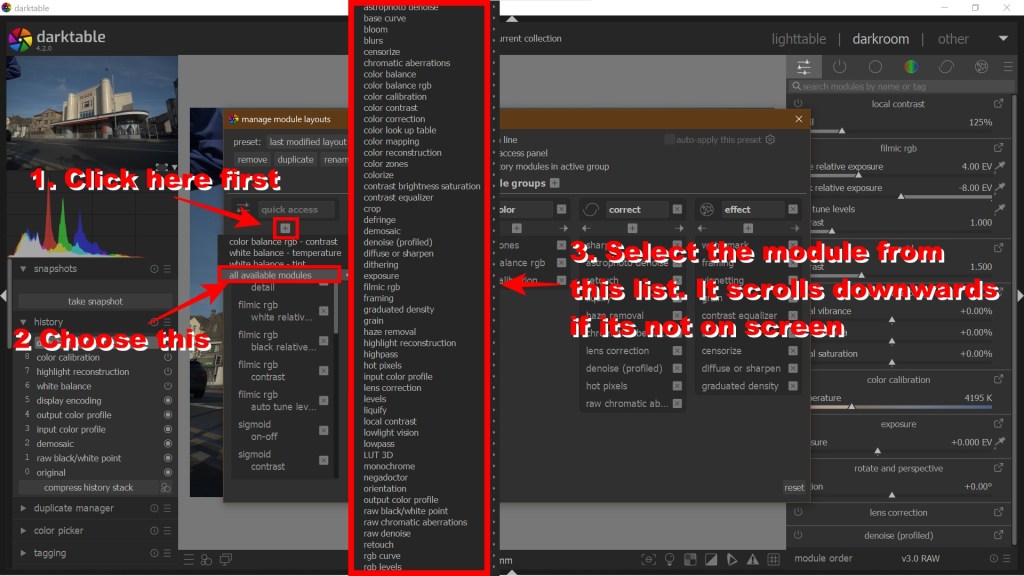
*As a short cut to adding a module, you can right click on the “Quick Access Panel” icon (the sliders) and it will bring up a selection of modules you can remove and add. Move to the modules you want to add/remove.
Adding the sigmoid module
Since its introduction in Darktable 4.2, it has become a preferred choice, or an alternative choice to many users!
Simply follow the initial instructions, and then choose the sigmoid module from the “all modules” section! Once this is added, I would right click on the module while in the quick access panel, and add the “contrast” option to make changing the module quick and simple.
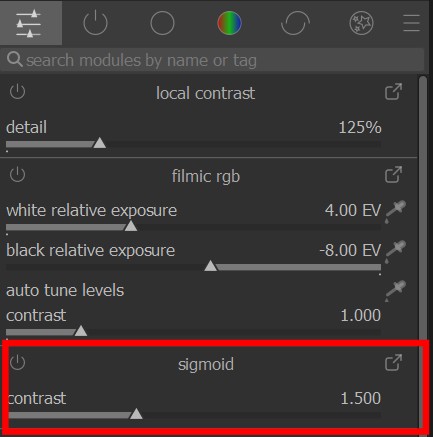
Of course, the temptation is there to add many more modules, but I think the quick access panel works best because it’s simple, so by just adding the sigmoid module, you keep the spirit of the panel, but just make it better!
Further minor tweaks
While you are here, there are a couple of other little tweaks I’ve made that just enhance the quick access panel. When you right click on the module name, it brings up a list of items you can display with the module, and this is very useful and it is what I used for the following small tweaks.
Tweaking the Filmic RGB quick access section
While in the quick access panel, right click on the Filmic RGB module and select the “auto tune levels”. And instantly you have that option now available in the quick access panel, without having to go into Filmic RGB or pressing the individual buttons in the module as was previously the case before adding this.


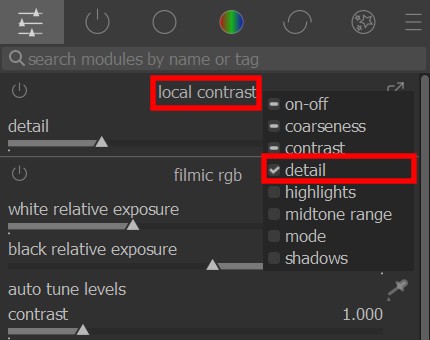
Tweaking the Local Contrast quick access section
Secondly, while in the quick access module again, right click on the Local Contrast module, and select “detail” and you can now, once again, adjust this without opening up the full module.
Do not get get too excited and add everything!
As mentioned above, you could easily get carried away, but do not get too excited adding modules. I originally wrote this so that you could add the crop module, however, adding the crop module to the quick access panel just does not work, and once the module is active in the quick access panel, it simply turns cropping on and off. You could use it as a shortcut to take you directly to the crop module, but its just taking up space in the quick access module.
The finished Quick Access Panel
And here it is, it all its simplicity after a couple of changes.

I hope you found this little guide useful. It is just a couple of simple additions, but it makes things so much easier for your workflow. Of course, you can add (and remove) what you like from this panel, but keep it simple, as this is the idea of this quick access panel.
If you’ve found this useful, please remember to like, comment and subscribe.

Hello Mark,
This is another great tutorial to help your readers make their Darktable easier to use.
I didn’t even know the auto-tune in the filmic module, Thanks Mark !
LikeLiked by 1 person
Thank you! Yes, hopefully it’ll make things easier for people, as some find Darktable quite hard to get to grips with.
LikeLiked by 1 person
Mark, Interesting article, thanks. It’s just that, as is usual with me, I can’t follow it. In connection with adding sigmoid: there is no ‘little plus sign’ in my version of dt 4.2 (windows or Linux) in the ‘manage module layouts’ panel which is displayed after selecting ‘manage presets’. See the attached screen shot. Neither is there such a plus sign showing in the image given in your article – allowing for the gross loss of resolution and sharpness when viewing at only 1080p – which is the best I can manage for emails.. Next, there is no ‘all modules’ option to choose. Next, your ‘step 2’ instructs me to ‘select this’ (I think that’s what it says, but the text is difficult to make out because of the choice of a very small bold face font with a shadow), but it is impossible to make out what the ‘this’ is. Your step 3 shows a list of modules which is not presented on my system, no matter which quick access item I select, by guess work, in Step 2 – for the simple reason that this module layout panel is a built-in read-only preset – and it says so at the bottom of the panel.
So you have clearly set you system up in a way which is different to mine – which is the default organisation as far as I am aware, using a scene-referred workflow.
Could you enlighten us on what you did?
Regards Tony Hamilton
LikeLiked by 1 person
I shall make a video on it in the coming days to follow. I’ve had good feedback from a few people in the Darktable groups, so I know this guide works. You can then let me know how things differ with your version. I think people would like to see it done in sequence on video. Thanks for your feedback Tony, much appreciated.
LikeLike
Right click on the actual quick access tab icon to add sigmoid…select on off…it will be added to your QA panel…then you can right click on the header there to add the slider/options you want from sigmoid…
LikeLiked by 1 person
I’ve amended the guide with that technique as well. Thank you Todd.
LikeLike
Hi Mark, That has very effectively fixed all the issues I had – very straightforward now and a useful technique to know about. Thank you for making us aware of it. Great job.
Regards Tony Hamilton
LikeLiked by 1 person
The other technique would allow you to change any of the modules in the manager, this one is certainly a quicker fix. Hope that it helps.
LikeLike
Try right clicking on the quick access module (the sliders icon) and then adding via that option. I have amended the guide to include this way of doing it as well.
LikeLike
The plus sign won’t show up in the module manager for the built-in presets. As the message at the bottom of the window will remind you, you first have to duplicate one of them to create an editable configuration, and then the plus signs will be visible.
Note that you don’t need to open up the module manager if the quick-access panel is already enabled – just right-click on its tab (the three-sliders icon) to pop up a menu with which you can add and remove controls. Choose the last entry “all available modules” to open up a two-level menu of modules and controls within each module.
LikeLiked by 1 person
Great 🙂
LikeLiked by 1 person
Thanks 🙏
LikeLike
Hi Mark,
thank you for this great blog! A lot of resources to dig through!
LikeLiked by 1 person
Thank you very much 🙏
LikeLike