
Introduction
Waterfalls are a magnet for landscape photographers, and even those who wouldn’t typically designate themselves as landscape photographers love a waterfall. They are undeniably photogenic and very difficult to resist, and are usually always at their prettiest at this time of year, in autumn, when the colour palette explodes. Getting the most from a waterfall image is all about experimentation, a little technical knowledge, and giving yourself plenty of options. A little knowledge of post-processing techniques can also help to make the final image pop. In this blog I will provide a condensed and simplified overview of some effective technical approaches to waterfall photography, and also share some tips on how you can maximize your artistic options in post-processing.
Gear
(i) Tripod
As good as IBIS (in-camera-body image stabilization) and lens image stabilizing technology is nowadays, I personally would still consider a tripod as a necessity for photographing waterfalls, because even though freezing water movement with fast shutter speeds may be your thing, you just simply never know how your own artistic taste is going to change from being on location to looking at your images on a computer screen. Therefore, you should at least be prepared for shooting longer exposures. You can definitely wing it shooting handheld, but the best results pretty much always come from committing to a composition and locking the camera down on a tripod (I’m sorry if you hate tripods, but their value for this type of photography cannot be understated).
(ii) Polarizing Filter
I also highly recommend a circular polarizer (CPL) for waterfalls. I understand that many photographers prefer to be filter-free, but honestly a polarizer could have been made solely for waterfall photography; it’s that impactful! Firstly, it will help remove distracting glare from the surface of the water, wet rocks and foliage, and will also pleasingly boost contrast and colour vibrance. A CPL will also helpfully give a stop or two of light block and aid in slowing down your shutter speed. There are of course instances where you may decide that a bit of glare is beneficial to your image, and indeed you can finely control this by varying the amount of polarization applied; it doesn’t have to be applied fully all of the time. Do be mindful, however, that if using your filter on a wide-angle lens and there is sky in your composition that polarizers are at their most effective at a camera angle 90 degrees to the sun. Therefore, compositions using wide angle lenses may encompass areas where the polarizer is both effective and ineffective, leading to some odd (and often very annoying) anomalies in your images. When in doubt, always take an extra image with the filter unpolarized, or ideally removed completely.
(iii) ND (neutral density) filters
ND filters can be helpful, and are the filter type that most beginners believe is essential for photographing waterfalls, but the reality is most waterfalls tend to be amongst light-blocking woodland canopies, and therefore they are not always necessary for providing slow shutter speeds. They are nevertheless handy to have in your bag just in case. A 3-stop and a 6-stop (or a variable ND) are the most commonly used. A 10-stop filter is generally overkill for falling water but can nevertheless come in handy for another purpose (see below)
If you don’t own any filters but are thinking of buying some to try, they needn’t be expensive. Start with an inexpensive (but nevertheless decent quality) brand such as Neewer or Zomei. To be able to use your filters on all of your lenses, simply buy the filter size that corresponds to your largest diameter lens, and buy separate step-up rings (don’t confuse with step-down rings) to adapt them to your smaller lenses.
(iv) Cable Release
Another handy gadget to have with you is a cable/remote release. These are most commonly used (out of necessity) for bulb exposures (30 seconds+), but they are also a convenient alternative to using the self timer.
(v) Lens Cloth
Never forget to take a highly absorbent wiping cloth (such as a microfiber) as there is usually always a lot of spray near waterfalls. Believe me, if you notice water drops on your images afterwards on the computer it is not a nice feeling at all, and it can be a very cumbersome job cloning them out. They’re particularly visible when using wide angle lenses, so remember to check your lens or filter regularly between exposures.
Focal Lengths
I’m a big believer in covering all grounds with lenses, so take a range of focal lengths with you. Of course, waterfalls often involve significant hikes, so try to be as economical as possible to keep the weight of your camera bag down. However, it is always reassuring to have options, and so the more focal lengths you can carry with you the better prepared you’ll be.
Shutter Speeds
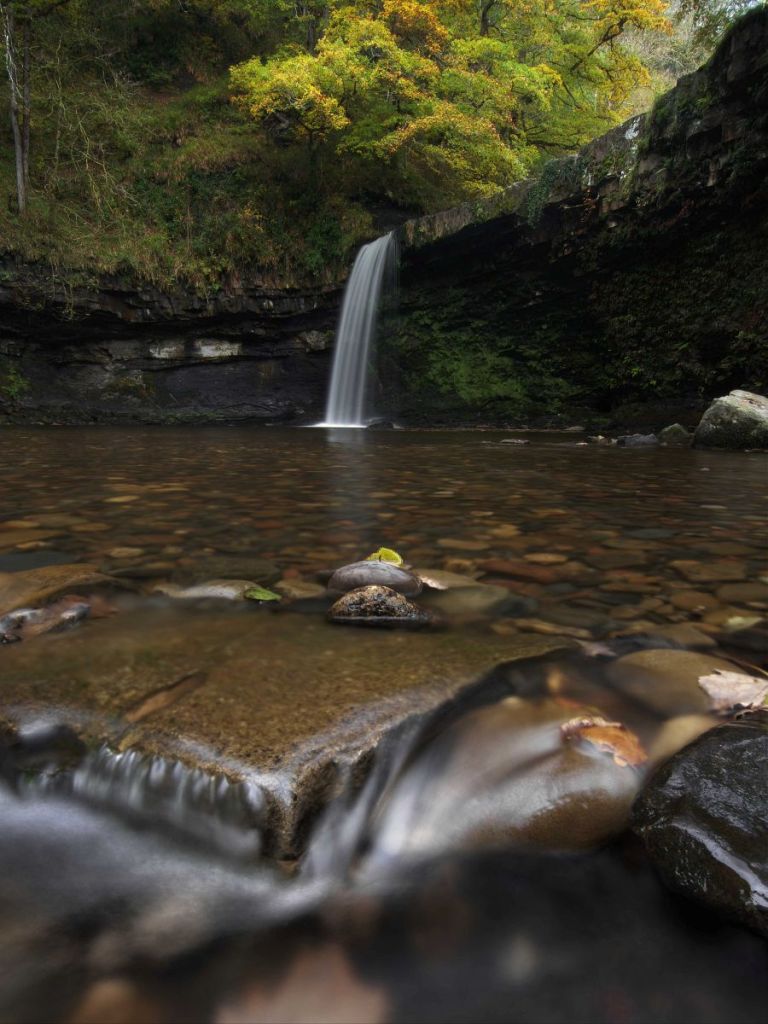
Talking of options, give yourself options with shutter speeds too. Some people prefer very slow shutter speeds to give the really smooth water effect, some prefer fast shutter speeds to freeze the motion of the water, while others (including me) prefer those in-between shutter speeds that give a sense of motion and power in the water without losing all the texture. I usually start at 1/15s and take multiple images, each getting a stop slower from there, i.e. 1/8s > 1/4s > 1/2s > 1s. The max I usually go for falling water is 1-3 seconds, but I always have multiple exposures to choose from because my final artistic decision is often made afterwards when looking at the images on the laptop.
If conditions are bright and you are struggling to get the shutter speed slow enough and are out of other options (e.g. no ND filters) then get the shutter speed as slow as you can (for example 1/30s) and take multiple exposures at that same speed. These can be stacked afterwards in post-processing to emulate the look of a longer exposure. For example, if you stack 30x 1/30s exposures it will give the look of a 1 second exposure.
Post-Production Ideas
(i) Orton Effect
The Orton Effect was originally a darkroom method for slide film devised by landscape photographer Michael Orton in the 1980s to give a slightly blurred glow effect. In the digital era a number of post processing techniques can closely mimic this effect, but it can easily become sickly-sweet if overdone. When applied subtly, however, it can really transform an image and give an ethereal, dreamy look, and works very well with woodland photography (or anything containing foliage), sunsets, and even portraits. My favourite way to create this effect also happens to be one of the simplest:
>add a Gaussian Blur filter and set the amount of pixels to approximate the megapixels of your camera e.g. 24px for many modern digital crop sensor and full frame cameras. Next, change the blend mode of this filter to “Soft Light”. You will notice the contrast and colour saturation dramatically increase with a residual (but still excessive) blur remaining. Pull the opacity of the layer all the way back to 0% (to start afresh) and slowly reintroduce it until the desired intensity is achieved (10-20% is usually plenty). Just remember, less really is more with this effect. You can also experiment with blend modes; for example, “Screen” will give a more high key and low contrast result, whereas “Multiply” will give a darker, higher contrast result. “Overlay” is somewhere in-between and also worth experimenting with, but “Soft Light” is usually the one I opt for.
(ii) Shutter Blending
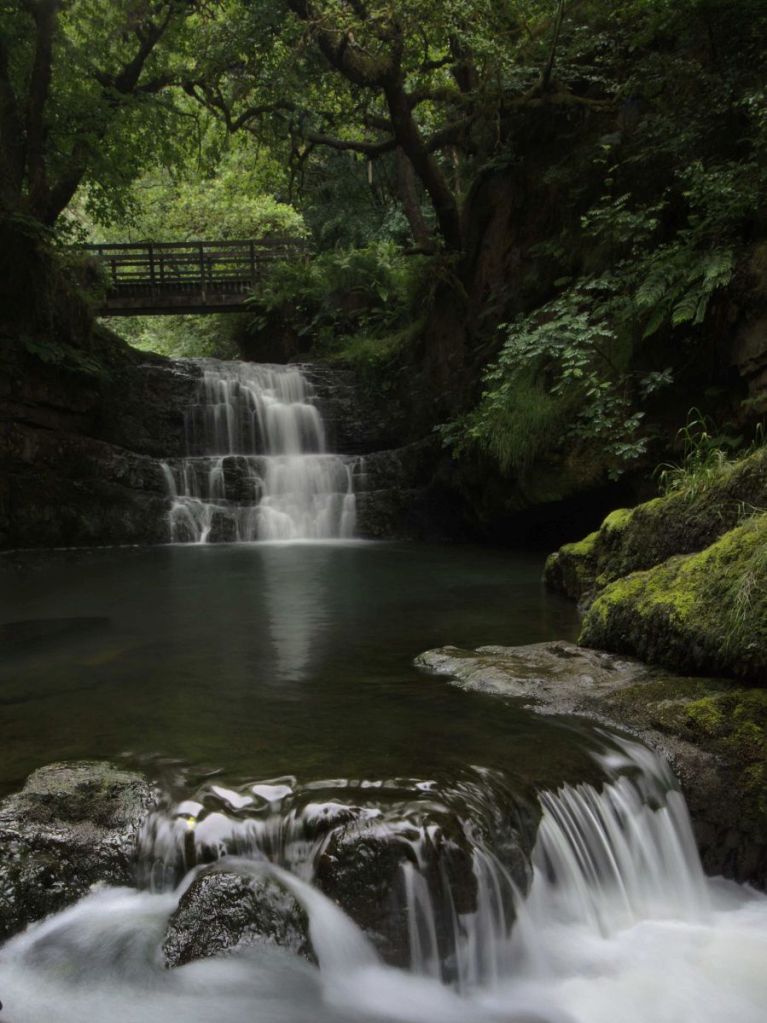
Remember earlier I said that a 10 stop filter could potentially come in handy? If I am photographing a series of falls that are separated by calmer pools of water I will usually take an extra very long exposure with a 10-stop filter. This will of course give a very marshmallowy look to the falling water (which is fine of you like it) but it will also give a very pleasing flat calmness to the pools of water, and likely potentiate reflections. I often mask these areas into a faster exposure that better suits what I’m after for the falling water. That way I get the best of both worlds. For this specific purpose, do not be afraid to close your lens aperture all the way down to f/22 because you’re only going to be using unsharp areas of the “donor” image anyway. Such shutter blending can also be a useful technique for ridding an image of motion-blurred foliage; just simply mask in the foliage from a faster exposure.

Conclusions
This blog may initially seem like a lot of information to remember, but it comes automatically when you’ve done it a few times. Keep a checklist with you so you don’t forget anything, and remember that there is no rush. A side-benefit of using a tripod is that it allows you to relax and gives you time and headspace (while also freeing up both of your hands) to concentrate on other things. And besides, waterfalls are beautiful, relaxing places to be.
Chill out, and take your time working through your checklist. It wouldn’t be unusual to spend over an hour at one waterfall, working the scene, setting up a few compositions and shooting the necessary images. Take your time and just enjoy being there.
David C. Ellinsworth Ph.D.
ellinsworthpbotography.webstarts.com
instagram.com/davidellinsworth
flickr.com/photos/davidellinsworth
facebook.com/DavidCEllinsworthPhotography

Great tips and a well written post. The only thing I would add would be about exposure. Waterfalls by their nature nearly always have extreme contrast – deep shadows and waterey highlights. Sometimes even from RAW files this can be a challenge, especially if the sun is out. I will often take at least two different exposures of the scene, one to expose the highlights so they’re not quite blowing out, to get the most detail in the flowing water, and one for the shadows, to get detail in rocks and ferns without adding grain. A third exposure roughly in the middle may also be required. The correctly exposed areas can then be merged in your favorite editing program 🙂
LikeLiked by 1 person