In this article, regular contributor David Ellinsworth takes us through part one of his multi-part guide to photographing landscapes.
When I began photographing landscapes it seemed like an easy option. After all, landscapes don’t move; they’re easy targets, and so I thought if I stand in the right place with a great view in front of me I’d always get great pictures. However, what time has taught me is that the real challenge of landscape photography is not so much camera technique but rather a combination of observation, patience, persistence, anticipation and reactivity. The best landscape images can of course come from blind luck, but generally speaking the ability to tolerate frustration and to never lose sight of the end goal is what will ultimately help you in building a portfolio you are truly proud of. In this blog I will try and minimize the technical jargon and discredit some popular myths in order to help you begin obtaining more impactful landscape images. Future blogs will individually tackle a number of specific technical approaches, such as using filters, focus stacking, focal blending, exposure merging etc, but for now I have provided an easy-to-digest overview that will hopefully help with mindset.
Planning a Landscape Photography Shoot
For most of us with life’s everyday commitments landscape photography is something we do when we are able to, and not something we plan extensively in advance for (such as a professional landscape photographer would do). Nevertheless, it is entirely realistic (and helpful in the long run) to make the kind of plans that can be placed on the backburner for when shooting opportunities arise. Lockdowns are currently providing all of us with ample time to do this, so why not use this time effectively by planning and having clear ideas on record for when we can go out to our preferred locations?
An incredibly useful component of such planning is to quite simply compile a list of places that we really want to visit. Once we prioritize, say, ten locations we can then supplement each with more specific, well-researched information. For example, by using free apps such as Google Earth and SunCalc we can get a clear indication of whether a particular location is better shot at sunrise or sunset, and at which time of year (given that sunrise and sunset directions alternate between southerly [winter] and northerly [summer] angles in the east and west, respectively). The idea behind this is to remove the need for as much last minute preparation as possible. Two examples of such advanced planning are:
(a) “Llyn Y Fan Fach in the Brecon Beacons is best shot during a mid-summer sunrise because the main mountain peaks are north-east-facing, and will therefore receive direct sunlight as the sun rises (but not when it sets).”
(b) “Nash Point on the Glamorgan Heritage Coast is best shot during a late autumn or winter sunset because the south-facing cliffs are more exposed to the light of the south-westerly setting sun during this time, but never really receive direct light from the rising sun even when it is at its most southerly in mid summer. It is also an area best shot at low tide as the best views, compositions and notorious rock formations and pools are otherwise inaccessible”.
Planning is also important from a safety point of view, such as tidal directions or perhaps whether a torch may be needed if the walk to or from a location is a likely to be a bit sketchy in low light (both of these definitely apply to Nash Point, incidentally). Nearer the time you can begin analysing weather data for promising conditions (see my dedicated blog: “Predicting a Photogenic Sunset”).
On Location: Committing Yourself to a Composition
When I first started landscape photography I would take, on average, 200 – 400 images per shoot, all handheld. On the one hand I would have a huge range of images to choose from, but as time went on I increasingly found myself thinking “if only I took my time and refined this particular composition” or “this image would be so much better if I’d just moved 1 foot to the left”. In other words because I was a bit caught up in the act of picture taking and not really dedicating more than 30 seconds or so (often a lot less than this) to any given composition I would always feel that I could have got so much more just by taking extra time to explore and refine (“work the composition”, as they say). I now shoot landscapes mostly from the tripod (80%+), even when there is plenty light for handheld shooting. As I wrote in a previous blog (“Tripods and Landscape Photography: Not Just Out of Necessity”) tripods can feel rather cumbersome; the thought of setting it up just feels like a pain, but in fact once you’re set up with your shot composed and the camera locked down securely your hands are then free, and everything is much more relaxed and you can concentrate on other things, such as waiting for the most photogenic light or conditions, or even just take a couple of minutes to self-critique the composition and decide if it can be made better (every 1% counts). Of course, locking the camera down to a single composition means that you are committed and not shooting in other directions, which may be interpreted as a disadvantage. However, you’ve chosen the composition for a reason; it caught your eye and you were drawn to it, and it stood out from everything else, so why not take the extra time to refine it and ensure you capture it at its best? I have become far more content with between 1 and 5 well thought out and refined compositions, rather than having an SD card full of images and being at risk of not being totally happy with any of them. The only thing that should be cause for rushing is a fleeting moment of light, such as dappled light during breaking volatile weather. As such, it is important to be observant to what is going on around you in all directions, and be prepared to react fast! The very best light never ever sticks around for long. And light is pretty much everything!
Utilizing All Focal Lengths
Social media is crammed with misinformation on the subject of lenses for landscapes. There’s no shortage of “experts” there. One of Facebook’s most popular photography questions is “what is the best lens for landscape photography?”, and without fail over 90% of comments will recommend an ultrawide zoom lens (e.g. a 10-24mm on an APS-C crop sensor or 16-35mm on a full frame sensor) and not even mention anything else. This is incredibly misleading because it can wrongly convince a beginner to blow the entirety of what may be a tight and hard-earned budget on a single lens. The idea that an ultrawide zoom is a general purpose landscape lens is quite simply incorrect. Yes, they’re useful, but they serve a specific purpose, not a general purpose.
One of the main disadvantages of ultrawide focal lengths is that they stretch the perceived distance between foreground and background (extension distortion). It is for this reason that with such lenses leading lines in the foreground look very dramatic (usually a good thing) but the background seems much further away than you perceive with your eyes, and therefore even very large objects, such as mountains, can appear disappointingly small in the frame. The opposite is true for longer focal lengths (including long telephotos) because: (1) they generally suffer less distortion anyway, and (2) they are essentially just a crop of our visual system’s field of view and give the illusion of compression of the scene. You may have heard the expression “a great view doesn’t always make a great photograph”. In part, this refers to the impact lost through trying to cram a big panoramic view into the single frame of an ultrawide lens, or even just a moderately wide lens.
These days I find myself shooting more and more with longer focal lengths, and it’s actually quite simple to understand why. Let’s think about how we observe landscapes when we don’t have our camera. When first confronted with a panoramic view we quickly scan from one side to the other, naturally marvelling at the beauty and scale of it. However, in reality this doesn’t hold our attention for very long. In no time at all our eyes hone in and rest on what we find most interesting, and we unconsciously discard the remainder of the scene from our immediate attention. Sound familiar? Sounds exactly like a telephoto lens to me. Of course, our eyes are prime lenses (equivalent to around 42mm on a full frame sensor) and therefore do not literally zoom, but this is the beauty of longer focal lengths: they allow us to “reach and grab” distant compositions that attract us. I’m in no doubt that my most original landscape shots have come from my 50mm prime and 70-300mm zoom lenses, not just because of what I’ve included in the frame but, crucially, what I’ve forced out of it.
In short, ALL focal lengths are valid for landscape photography. The more you have available to you, whether you shoot zooms and/or primes, the more options you have.
Getting the Most From an Ultrawide Angle Lens
As alluded to earlier, pointing an ultrawide angle lens at a big panoramic view is likely to “weaken” anything in the distant background. However, the stretched perspective may actually be what you want if you have interesting leading lines/foregrounds close by that you want included in the frame. One trick you can do to minimize the loss of impact of background subjects (e.g. mountains, waterfalls etc) is to compose your shot so that the background is pushed towards the top of your frame (within the realms of compositional balance, that is) to allow the distortion of the lens to stretch it. You can also get the best of both worlds by “focal blending”, whereby two frames of the same composition are taken at different focal lengths; a wider one for the foreground and a longer one for the background. This technique does require some knowledge of merging frames on layer masks, but can be very effective (I’ll likely cover this in more detail in a future blog).
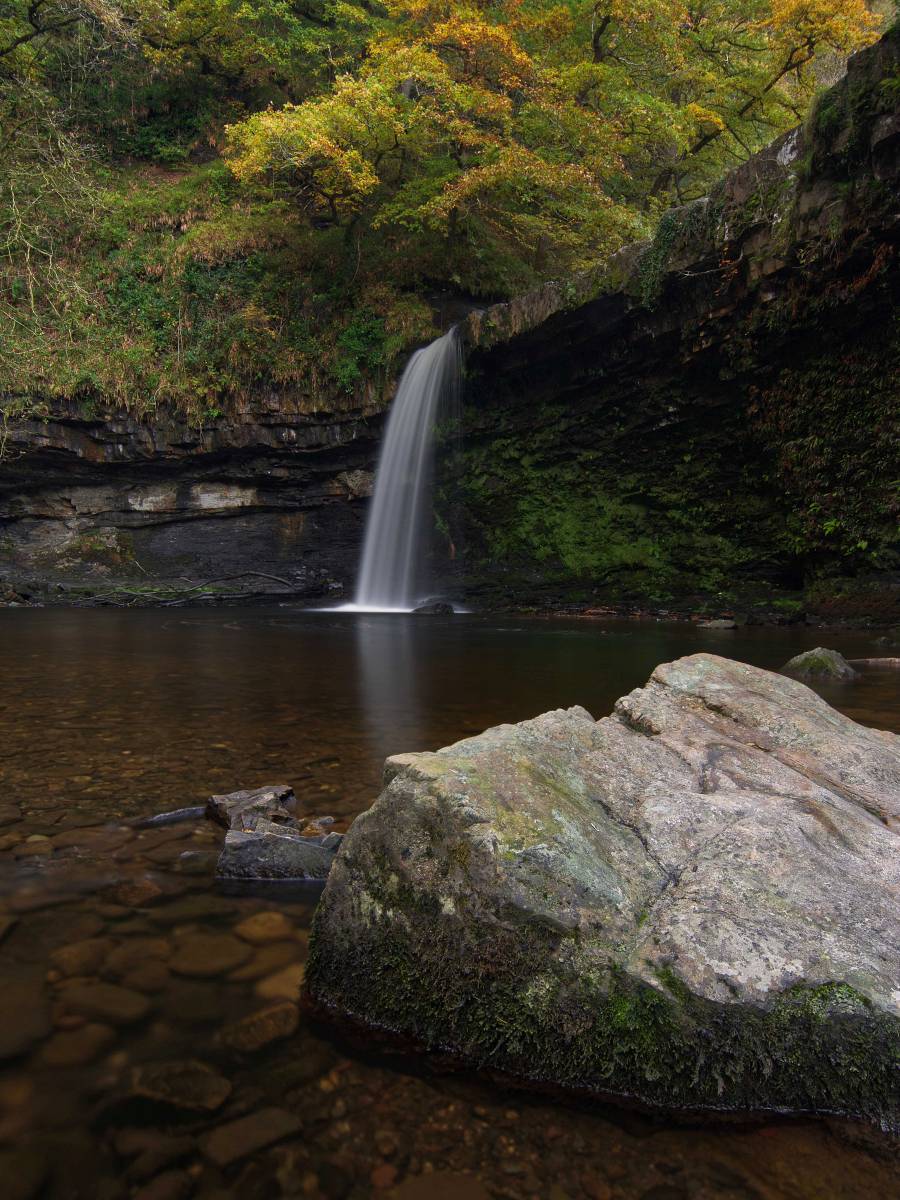
An ultrawide lens really comes into its own, however, when working in tight spaces, for example waterfalls that are surrounded by tall trees and/or rock faces, and where foreground interest (water flowing over rocks, for example) resides close to the fall itself (see Figure 1 [left]).


Figure 1: Two examples of extension distortion, both shot on the Tokina 11-16mm. In the waterfall image you will note the impact of the foreground, but anyone who has visited this waterfall will know that it looks much bigger to the eye than in this image. Similarly, in the sunset image the tidal streaks look stretched but the landmass (Mumbles) and setting sun in the background look very small in the frame.
This is not to say that ultrawides should not be used for big open scenes at all. I use my Tokina 11-16mm a lot at the beach when composing straight out to sea (see Figure 1 [right]). In many such cases the main subject tends be the foreground, and so the stretched perspective of an ultrawide angle can really add drama to the shot.
Panoramas
I regularly shoot panoramas because of their distinct look to ultrawide focal lengths. They allow for a wider field of view while using focal lengths that do not suffer from extension distortion. Rather, they allow the illusion of compression to maximise impact of distant subjects. Whether you choose to shoot with an ultrawide lens or create a panorama is entirely a creative decision, and largely depends on whether immediate foreground are important to your composition, or whether the background needs to be dominant in the frame. An added advantage of panoramas is that pixel count is cumulative, and you can therefore create very highly detailed images (and therefore make very large prints, if you choose to).
Important things to remember when shooting panoramas are:
(1) level your tripod and ensure that as you sweep your camera across that it remains level (use your camera’s built in electronic level/horizon to assist, if it has one),
(2) compose a little wider than you need to; that way if your panoramic sweep isn’t perfectly level you still have cropping space,
(3) shoot in manual so that your exposure can be locked, or if using aperture priority then assign your back button for exposure lock and hold; you really don’t want your exposure settings to change as you pan the camera.
(4) when metering ensure that you take into account both the deepest shadows and the brightest highlights in the scene (a live histogram is extremely useful for this if your camera has it),
(5) use manual focus or back button autofocus in order to prevent the lens re-seeking focus each time you press the shutter button,
(6) use the self timer to allow time for the camera to stop shaking after you press the shutter release, or better still use a cable release.
(7) once you have captured all the images ALWAYS double check each frame for both focus and motion blur (this is a massively annoying mistake to discover on the computer afterwards).
Of course, panoramas can be shot handheld. Personally, I wouldn’t recommend this, but at the very least make sure your shutter speed is permissive for the focal length you are using (1/[focal length x crop factor]) and use your lens/in-body image stabilizer if applicable. It’s doubly important to check each frame for sharpness after completing a handheld panorama.
A common misconception with panoramas is the “obligatory” letterbox shaped aspect ratio (16:7, for example), but I rarely shoot them with this in mind. I actually shoot panoramas for my preferred 4:3 or 4:5 aspect ratio (see Figure 2). It is generally the look of the longer focal length I’m after, not the elongated aspect ratio; but of course your creative aim may be different.

Concluding Remarks
If I was only allowed to provide only one piece of advice for shooting landscapes it would be to enjoy the location and absorb your surroundings first. It is so important to allow time for discovery before getting your camera out of the bag. Also, in the grand scheme of things, what would be the point of stepping into a beautiful landscape if we’re permanently restricting our field of attention via a viewfinder or an LCD screen. Only when we take the time to pin down and isolate what we love most about a particular landscape can we hope to come away with images that will stand the test of time. Camera settings, tripods, filters, post processing techniques – these merely polish an image; they don’t make an image.
The next part of this series will be coming to this website very soon. For more in-depth articles and tutorials, please visit the blog section of this website, where there is a wide selection of informative and helpful blog articles.
