
Darktable is a free and open source photography application and raw developer. It is very similar in operation to Adobe Lightroom, and includes both a virtual light table to view all your images side-by-side and a darkroom for your images. It gives you full management of your images in its fully zoomabale lighttable view, and all the creative tools you need for a quick and professional workflow. It’s available for Windows, Mac and Linux operating systems, and the current stable version while writing this is version 3.4.
I’ve been using and promoting Darktable amongst community’s for many years, and a lot of people download the software, but give up after a short time due to its learning curve. It’s not that it’s difficult, it’s just it’s sometimes a little different, and has hugely powerful tools and modes which need to be practiced with.
With this article I want to make the transition into using Darktable a lot easier for the average user, by referring to other material that will make your life much easier.
I’ve broken it down into a number of areas:
Quick start – A brief but informative quick start guide.
General guides – Links to help you getting started with Darktable.
Additional resources – Links to add-ons such as Darktable styles and LUTs.
Extra information – Even more to help you on your way.
As Darktable is free and open source, I’ve made sure that every source I give you is free of charge to use.
Quick Start
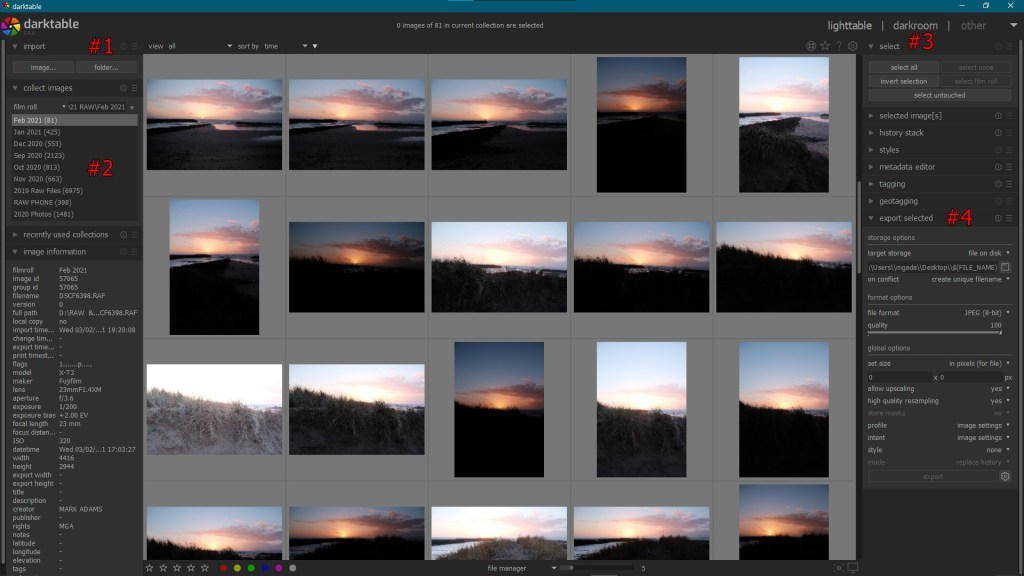

These two above images display Darktable in firstly the lighttable view, and secondly the develop view named darkroom. This quick start section will get you up and running within seconds!
Before we start, please download the most up to date version of Darktable from here. This is the official website, and the one you should always use for downloads of stable versions of the software.
To load images into Darktable, simply be in the first view, and on the to left you have the option to import by folder or single image (marked #1). When you select either of those options, you’ll go into a browser mode to select which image(s) you want to import. Select and then import them.
Any folders will show up on the left of the screen, as shown in the example screen shots (marked #2). Simply click on these to access the appropriate images. There is a lot of information on that initial screen, but to start just concentrate on loading images and scrolling through them.
Once you find an image you would like to edit, double click on the image, or click it once to highlight it and then click on “darkroom” (marked #3) on the top right of the screen. This will take you into the second example page, which allows you to edit your image.
Darktable is made up of many modules. The second example image above shows the modules I have saved as my favourites (marked #5), and are the ones I most use to get the job done. Your needs might differ slightly, however my list incorporates everything you need to make adjustments to exposure, colours, sharpening and more.
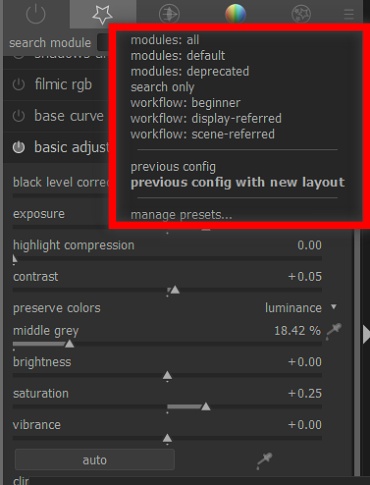
Modules: There are a vast amount of modules that you can utilise in Darktable (marked as #5 in darkroom view photo). Darktable offers you the ability to choose which modules you would like to use. By clicking on the three bars on the top right of the modules menu, it will bring up this menu which I’ve highlighted in red.
I would choose all, default or beginner if you are just starting out, and make use of the search function (marked as #6). Don’t be afraid to play with all the settings in a module, you can reset the parameters by pressing the (I) option which is just across to the left of the modules name, or simply turn off the module. Should you not want it altogether you can leave it off, or click on the last edit in your history stack on the left of the screen (marked with #7).
Play with the sliders and see what they do!
Don’t be afraid to experiment with the modules. There is a search box available on the to right of the screen (marked #6), where you can search for modules. If you want to search for a module to adjust contrast for example, for “contrast” into that search box, and all modules that deal with contrast will show up. You can then simply click on the module and used the adjustments from there.

Masking: Each module in Darktable allows you to apply various masks to your editing. Masks allow you to isolate certain sections or elements of an image, and target them so that only they are affected by the current module.
An example of this is perhaps to alter the exposure of a sky by using a drawn or paremetric mask to lower the exposure.
Every module has the following mask options available, available from the section marked (A): Off, Uniformly, Parametric, Drawn & Paramtetric and Raster. Section (B) gives you the ways to apply the mask, brush, circle, ellipse, path and gradient.
Darktable users vectors with its drawing of masks, so you can easily edit the mask once it’s drawn. This allows for ultra-fine tuning via moving vector points or feathering.
Masking is particularly powerful in Darktable, and it is well worth reading the manual and watching the videos which are listed as resources in the general guides section of this article. Once you perfect your usage of masking, Darktable becomes infinitely more powerful than it was without using them.
On the left hand side of the screen you can see your history stack (marked #7), this shows you all the adjustments you have made. Hovering over each history point shows you the adjustments you made. There’s a lot you can do with the history stack, and you’ll find resources for it in the next section.
Once you’ve finished editing your image, you will need to come out of the darkroom module and back into the lighttable. Make sure the image you want to save is highlighted, and the bottom most menu on the right hand side shows your Exporting options (marked #4). Simply check it’s set as you need, and click export.
This should be enough to start you on your journey with Darktable, but there’s loads more learning ahead. Below should help you discover the power of Darktable.
General Guides
Darktable has a learning curve, which means you will need to put time and effort into learning it. Before you even start, Darktable provides a user manual which can be found here. I recommend you keep this link to hand, as it’s an invaluable resource for your work.
YouTube videos are a modern and useful resource, with some very knowledge people sharing their knowledge. Even today, with my knowledge of the software, I watch these videos with great interest as they can be a revelation, as people use different techniques for different things.
Rico Richardson has an amazing source of YouTube videos which can be found here. As well as long-form videos, Rico has a section of quick reference videos which he calls “No time wasted learning Darktable”, which are perfect for refreshing your memory when you just need a quick refresh on a module and can be found here.
Bruce Williams channel offers much more in-depth long-form tutorials, and he takes each module, one at a time and examines them in great detail. Bruce’s videos can be found here on YouTube, and I highly recommend whenever you get the chance, you watch each and every one of these. If you’re a complete beginner, Bruce has just released these videos for beginners, which can be found in three parts, here, here and here.
Aurelien Pierre, who is the designer and lead developer of Darktable has numerous, extremely in-depth videos of new and upcoming modules. They are vey technical, and can be found in English and French. To visit these videos please click here.
Boris Hajdukovic has the most inspirational YouTube channel, where he edits images in his “Editing moments” series. These videos really show off the power of Darktable, and are a must watch when you understand the basics of Darktable. Check out his work here.
Stefano Ferro hosts a great YouTube channel with editing tips, he focuses on giving editing tips for travel photographs, and that playlist can be found here.
Frank Walsh is the final recommended YouTuber that has some great Darktable videos. These can be found here, and are also definitely worth a look.
Additional resources
Darktable offers a complete package, however there are still more things you can add to it. There are Darktable styles, which will emulate various film stocks or different looks, as well as that, Darktable is able to use LUTs (look up tables), another huge plus point to this free program.
A Selection Of Darktable Style is available, containing 14 scene referred new styles for Darktable 4+ designed by myself, with full instructions on how to use them.
Open Source Photography by Marc Roovers is a leading source for quality LUT (LookUp Table) downloads which enable you to colour grade your images to match certain styles. Marc has some amazing LUT’s for simulating Fujifilm cameras, Infrared images and much much more! Check out his website here.
dtStyle host a fantastic website for Darktable Styles (very much like image presets), watch Bruce Williams’ video here to learn more about them. And visit the dtStyles website here to see which styles are best for you.
T3Mujin have a great selection of dtStyles here which replicate old film and more!
Extra information
As well as all the above information, Darktable has a great Facebook community which can be found here. It’s the perfect place to learn with others, and generally the group is a friendly and very helpful.
From One Camera One Lens you can also find these useful articles about Darktable:
Quickly Get A Workable Image From Darktable
Why Darktable Is Perfect For Fujifilm Users
Hopefully this resource will be enough to start you on your journey to editing and making perfect images in Darktable. Please support the developers in anyway that you can, be it spreading the word, sharing articles (like this one for example), sharing videos and interacting on their website through their various links. If you are a user of Gimp (GNU Image Manipulation Program), it may be of interest to you that if you load a raw file into GIMP while you have Darktable installed, your image will open up in Darktable, and once edited and closed down, the image will be sent to Gimp in 32-bit Tiff format for more editing.
This blog will be updated on a regular basis, to keep you up to date with the latest resources for Darktable. If you have any suggestions or would like your blog or YouTube channel mentioned, please don’t hesitate to contact me.

Great guide Mark, easy readable writing. I’ve also been using Darktable more recently, especially to test cube files, but that also helped me learn more about it. And now I like it more and more. The styles were new to me – definitely looking in to that. Keep up the good work and stay safe !
LikeLiked by 1 person
Thank you Marc, I love Darktable, it’s getting better and better with each release, which is very exciting. So much you can do with it.
LikeLike
Downloaded Darktable and been using it today to reacquaint myself. Will start to be a bit more systematic over the next few days. I found exporting a bit strange after being used to”Save As” but getting there. Thanks for posting! Take care. Stay safe!
LikeLiked by 1 person
Thank you John. Once the basics are learned, it’s quite intuitive.
LikeLike