Darktable is the go to free photo editing software for many people. It’s powerful and has many features that even paid software doesn’t have. However, when people start learning Darktable, they find it hard to to get a good workable starting point.
I decided to write this article to help those many people who feel that they can’t get you a starting point similar to their jpeg images that they get straight from camera. I know it’s a strange thought for some of us, but I think at some point, many of us have wondered how we get images close to the jpeg just to give us a head start.
You can use the base curve module in Darktable to replicate a camera type, but moving forward it looks like Darktable is moving away from this approach, so here’s my little technique to set things up for editing.
Instructions
The first thing you’ll need to do is ensure that Darktable is set up for a scene referred workflow (this is the way Darktable is headed, the other workflow is display referred), don’t worry for now about what they mean, we will tackle this later.

Once this is set, you are ready to go. Open up your image that you want to edit from the light table and it will be ready in just a few clicks.
Start from near the bottom of the first module set (this will show a list of modules as seen in this image below) and is called the “Quick Access Panel”.
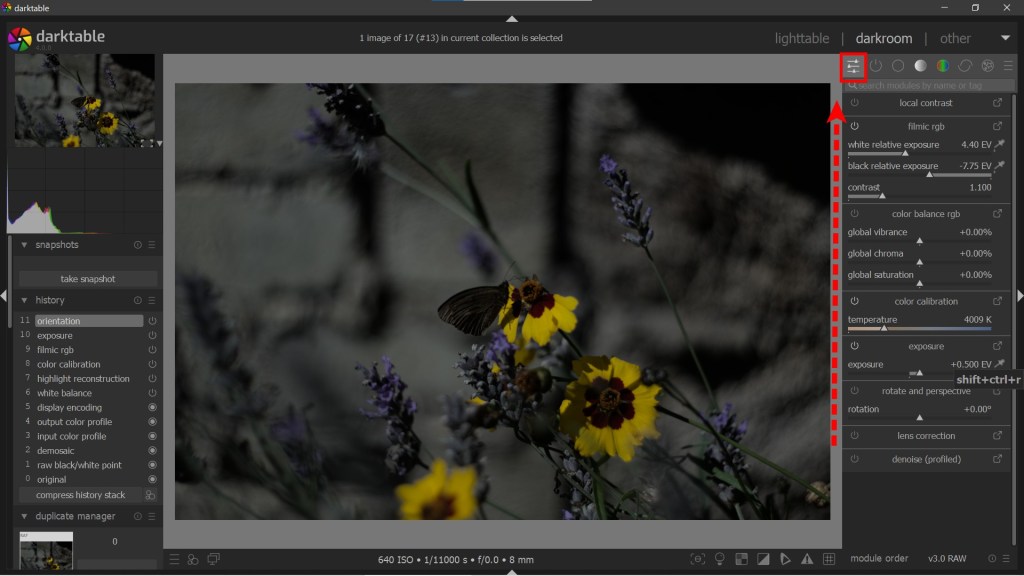
Make sure that firstly you adjust the (1) “lens correction” and the (2) “exposure” setting. Spend time getting the exposure correct as it makes everything else easier when it’s accurate. Feel free to turn on your highlight over exposure guide and shadow under exposure guide.
Move up to (3) “global saturation” and set this to 50% to start (either drag the slider or right mouse click on the saturation slider and type in 50 when the dialog box opens).
Next move up to (4) “global chroma” and set this to 25%
In the “Filmic” module, click the bottom (5) auto button, wait for it to do its thing, and then click the top (6) auto button.
Finally click on the (7) “Local Contrast” right hand button to open up the module. Then set the “Amount” to 150.

*These are starting point focus, which you can adjust once set. For some scenes saturation can be reduced, or local contrast. Have a play once they are set.
Start editing
After these few tweaks, your image will be much more like the original jpeg or at least much better to with with (depending on colour profile you used, colours themselves may differ).
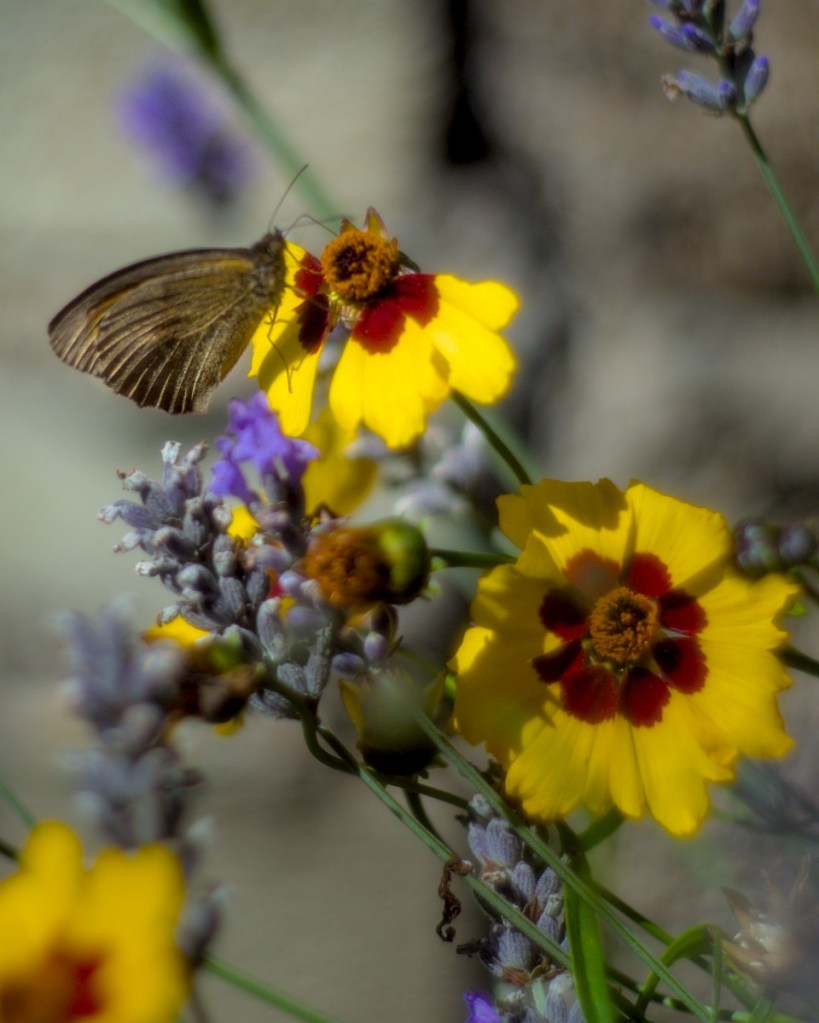
Cropping the part I wanted, added a vignette and some bloom using the diffuse/sharpen module.
I have included a DTStyle here which can be downloaded and used in your own Darktable edits. To use this, load in your image, adjust the Exposure and then add the DTStyle. I hope that you find it useful.
Hopefully you found this useful. I have written more useful Darktable articles which you might enjoy, plus I’ve edited many hundreds of images in this blog using Darktable:
The Ultimate Darktable Resource And Guide
Why Darktable Is Perfect For Fujifilm Users
Different workflows
As mentioned earlier, there are two different workflows in Darktable. These are known as Scene and Display referred.
In simple terms, these workflows are the way that Darktable handles the colour and brightness. For Display referred, the range it can edit is restricted by the computers display. As the Darktable website states:
“Display-referred workflow assumes that most image processing will be performed in the non-linear display-referred part of the pixelpipe. By default it uses the base curve module to tone map images from the linear scene-referred space into display-referred space, although other tone-mapping tools (such as the tone curve module) can also be used. Many modules are placed later in the pipeline (after this tone mapping transition) so that they work with gamma-encoded (display-referred) pixel values rather than linearly-encoded (scene-referred) pixel values.”
The Scene referred workflow does away with the constraints of the display, and allows far greater control of the colours that you use. As the Darktable website states :
“Scene-referred workflow assumes that most image processing will be performed in the linear scene-referred part of the pixelpipe. This helps to reduce the artifacts and color shifts that can result from processing non-linear pixel values and, by decoupling the image processing from the characteristics of a specific display, it makes it easier to adapt your work in the future to new display media, such as high dynamic range displays.”
That’s a bit oversimplified, but it should give you an idea of why Darktable is heading in this direction.
Conclusion
Getting started on Darktable can be complicated, but having a great starting point makes things so much easier! A lot of the time I will just use this start point, along with a vignette and very subtle other changes. I find in conjunction with this starting point, the most used other setting is usually Colour Lookup Table to change the shades of my greens and blues, but of course, this will be different for everyone.
Hopefully with this start point you will feel that you have somewhere to start from, and the initial point is not too far off the jpeg that you seen in the back of your camera.
If you’ve found this useful, please let me know!

Well thought-out workflow Mark, Darktable is not the easiest to start, but what software is it, now you have at least given a good starting point.
LikeLiked by 1 person
Thank you. There are so many of the same question on the group’s I visit with regards to just getting a starting point on Darktable! This seems to have helped quite a few anyway.
LikeLiked by 1 person